12 Design Tab
12.1 Project
Properties in the Project category contain general information about the project. This information can be shown in design views using the Project Information option. It is also used to populate some fields in plot headers and reports.
12.2 Selected Items
Here the properties of the currently selected objects are listed.
12.2.1 Fixture Plot Properties
Symbol will control which symbol is used on the plot for the selected fixture.
Symbol Usage will control which views the symbol actually appears in.
Direction snap is set to 30 degrees by default, this property controls the direction the fixture is facing on the plot.
Color by filter will set the fixture color to match the gel filter it has.
Focus is the property that allows text to be placed in front of the fixture to indicate where that fixture is focused. Ie, drums.
Show Optics is the property that controls whether or not the plot displays the optical information of the fixture.
Show Wattage is the property that controls whether or not the plot displays the wattage information of the fixture.
12.2.2 Smoke Box Properties
Control the overall amount of smoke in a smoke box using the Density property. You can also adjust the Variation from perfect haze to puffy clouds. Edge softness adds a soft edge to smoke boxes.
Smoke boxes are animated in real-time and the speed of the animation is controlled through the Speed property. This property is shared by all smoke boxes.
Smoke can also be patched to DMX. A smoke box can be patched by drag and dropping it in a DMX universe view like any fixture, or by assigning an address to the Patch property in the Design tab. See Appendix A for details on the DMX channel layout.
12.3 Views
Each of the three design views’ properties that are not available in the View menu can be accessed here.
The Grid width and Grid height properties determine the distance between grid lines.
The Field of view property lets you control the lens zoom of the view’s camera.
The Aspect ratio of a view can be set to follow 4:3 as well as 16:9. A mask is shown in the view to indicate content outside the chosen aspect ratio.
The White balance determines which colour temperature white will render as pure sRGB white on screen.
The Hue clamp setting affects the HDR colour grading. At 0% hue clamp colour grading is done per channel, at 100% hue clamp colour grading is done on the intensity of all channels.
The Bloom effect produces a “halo” around bright areas of light.
When enabled, the Laser flicker effect produces a flicker in laser beams with many points.
The Ambient lighting and Ambient lighting color settings control the ambient lighting of the view.
Fill lighting is an effect that mimics global illumination (GI). The Fill lighting adjustment setting can be used to control the intensity of the effect.
When Automatic exposure is enabled, the view’s exposure (brightness) adapts automatically to the current lighting conditions. The Exposure adjustment setting ban be used to tweak the current exposure.
The camera of a view can be remote controlled using DMX. This is achieved by assigning a DMX channel to the Patch property. See the DMX Tables appendix for more details on the modes available and their DMX channel assignments.
12.3.1 Visualisation Settings
Visualisation settings apply to all views that are in Live mode. They have no effect on image or movie renders.
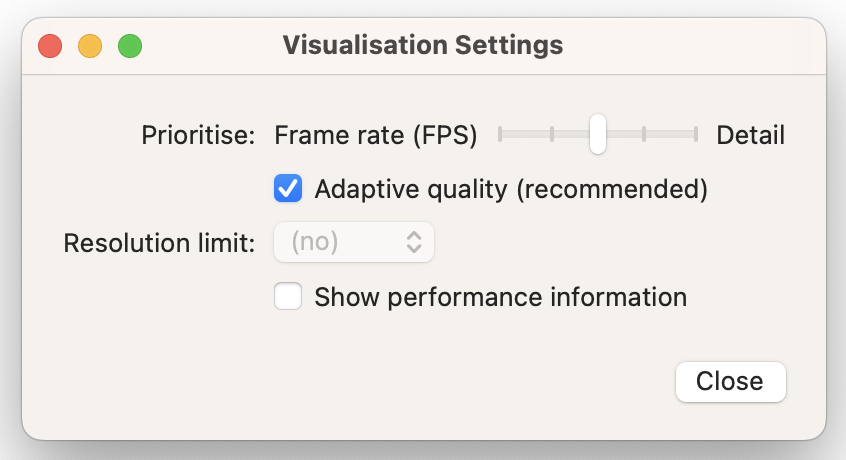
The Prioritisation slider allows you to choose whether you prefer a high frame rate or a high level of detail.
If Adaptive quality is enabled the resolution and quality of the visualisation is automatically adapted to the current lighting conditions and the performance of the computer. When disabled, the quality is fixed to 100% and it is possible to manually choose a resolution limit.
Under rare circumstances, such as with troubled video card drivers, the adaptive quality may perform erratically. In these cases disabling it and specifying a resolution limit may provide a workaround.
When Show performance information is checked, the current resolution, frame rate and quality is shown in the top right corner of views in Live mode.
12.4 Layers
Layers provide a means of grouping and colouring objects. Layers also provide some additional options for the objects in them.
12.4.1 Layer Properties
Objects in layers of higher Paper priority are always drawn on top of objects in layers with lower Paper priority.
Objects in a layer with the Locked property set cannot be modified using the mouse in a design view.
When the Unselectable property is checked, objects in that layer cannot be selected using the mouse in a design view.
When the Include in reports property is unchecked, objects in that layer will not appear in reports.
When the Fixture information property is unchecked, fixtures in that layer do not show any fixture information in design views in Live mode that have the Fixture information option enabled.
When the Fixture simulation options is unchecked, fixtures in that layer are not simulated.
12.5 Filters
Filters are essentially just groups of layers and universes. As per our previous example, having a layer for “All Moving Lights”, “All Generics” and “All LED” could be useful. They could then belong to the filter - “All Fixtures”.
Adding filters is done in the same way as layers. Click on the Add button in the Filters category of the Design tab and name the filter. Once the filter has been created, in the right hand section of the window, a list will appear showing all the layers and universes. You can use the check boxes to control which layers and universes belong to the filter you created.
It is possible to select the filter of a view using DMX by patching the camera of a design view in its extended mode and assigning a number to each filter. Up to 255 filters can be triggered using DMX, see the DMX Tables appendix for more information about the channel layout of patched design views.
12.6 Fixture Groups
Each fixture can be part of any number of fixture groups. Fixture groups are numbered with up to 3 decimal places. Fixture groups do not preserve any selection order.
The Add command creates a new fixture group based on the currently selected fixtures.
The Delete command deletes any selected fixture group(s).
The Update command updates the selected fixture group with the currently selected fixtures.
The Clone command clones the selected fixture group.
12.7 Camera Positions
Any number of camera positions can be stored and organised in catalogues. A camera position stores the location, focus point and field of view of a camera.
When adding, selecting or updating a camera position, the camera of the view that you are currently linked to is used.
Camera positions can be triggered using DMX by patching the camera of a design view and assigning numbers to camera positions and catalogs. See the DMX Tables appendix for more information about the channel layout of patched design views.
12.8 Scenes
Working with scenes allows you to modify the position and visibility of objects in different parts of a performance. Scenes are not stored or recalled – you are always working in one scene at a time and you can safely switch back and forth between scenes without risking loss of any position information.
In order for the position and visibility of objects to be recorded in scenes, the Include in scenes property of the objects need to be set. If objects have been grouped, setting this property for the group automatically includes all its objects as they will automatically track the group.
The Recall selected objects command recalls the position and visibility of the selected objects, from the selected scene, into the current scene.
The Store selected objects command stores the position and visibility of the selected objects, into the selected scene(s), from the current scene.
It is possible to trigger scene changes using DMX by patching the camera of a design view in its extended mode and assigning a number to each scene. Up to 255 scenes can be triggered using DMX, see the DMX Tables appendix for more information about the channel layout of patched design views.
12.9 Materials
Capture adheres to the PBR (Physical Based Rendering) standard for materials. Although the dimensions of material textures may vary, they are all mapped using a single UV map / projection.
Use the Add.. command to add a new or to import a material from a PBR texture set (see Importing PBR Texture Sets for more details).
12.9.1 Material Properties
12.9.1.1 Mapping
Use the Width and Height properties to define the physical real-world dimensions of its textures.
12.9.1.2 Base Color
The Color property defines the base color of the material. Capture utilizes the Physical Based Rendering (PBR) material model in which absolute white or black should normally be avoided.
If a Texture is applied it will be combined with the Color property.
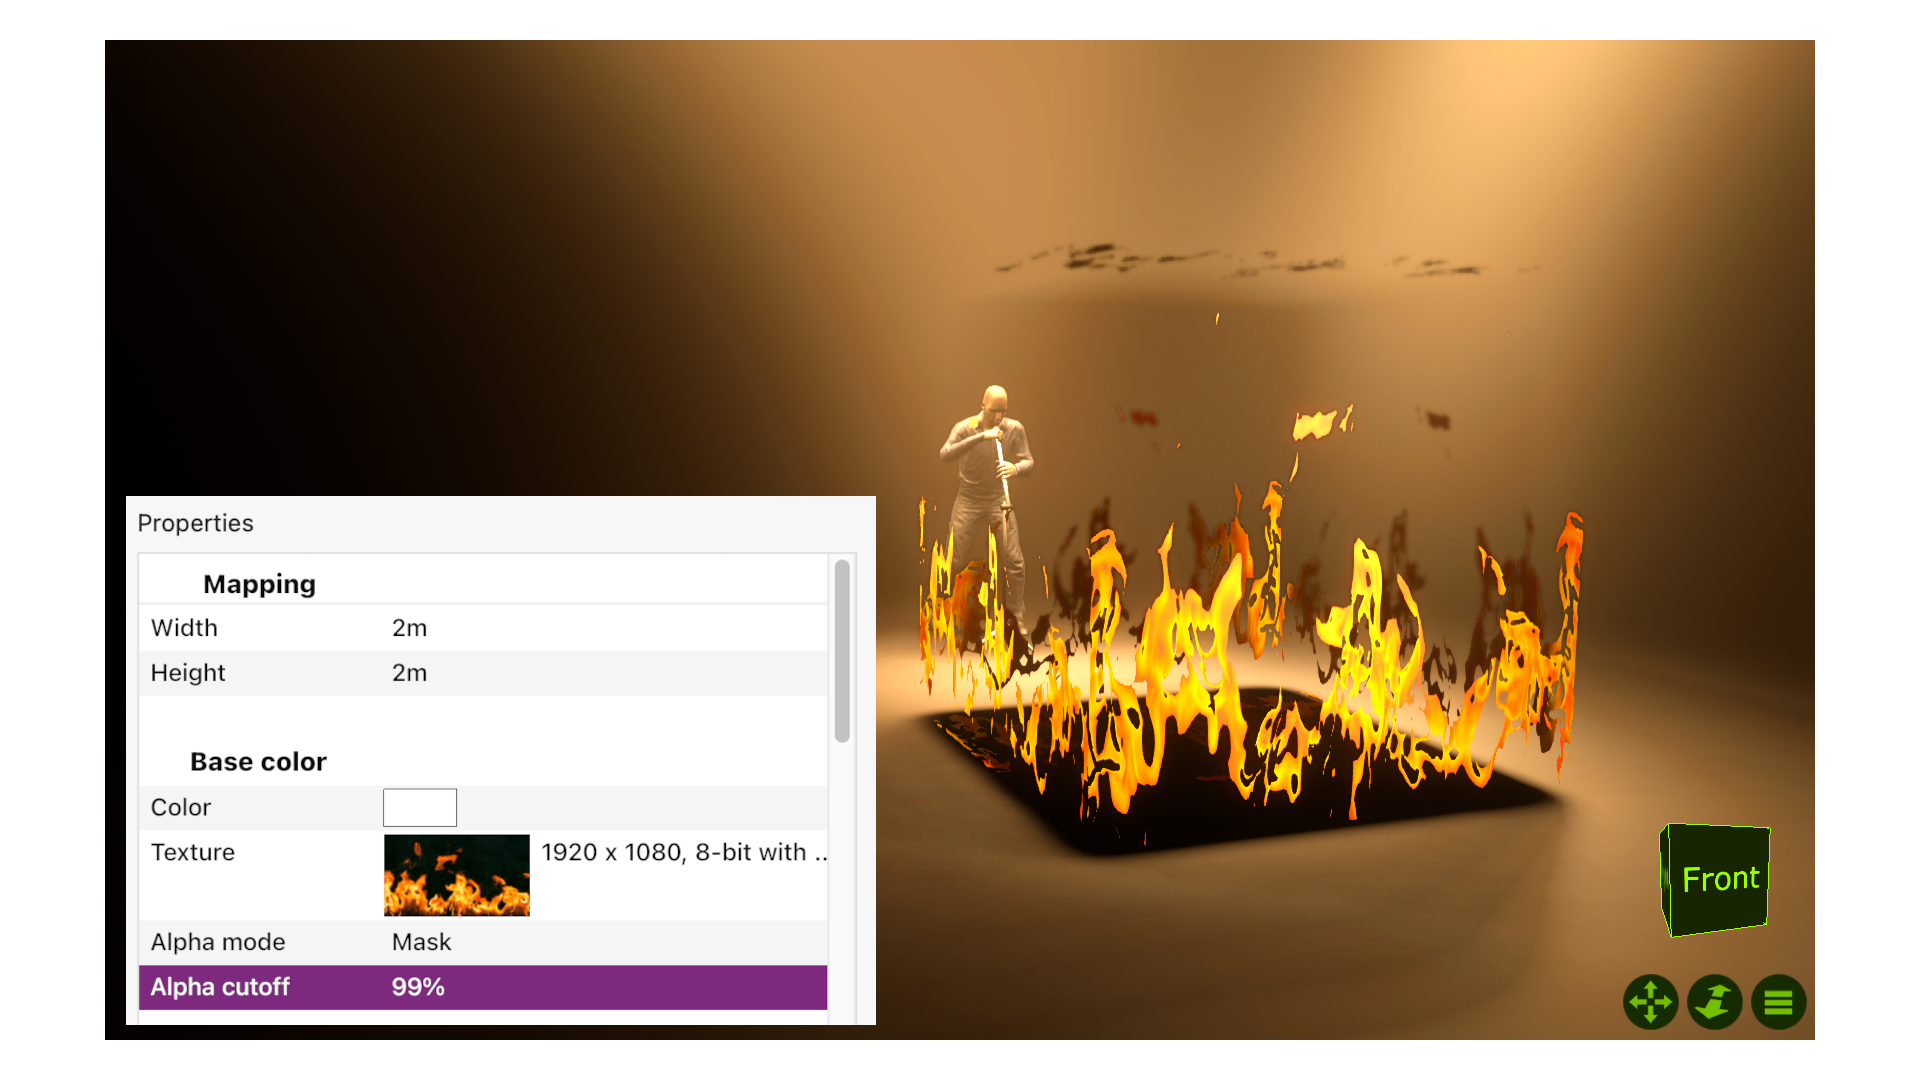
Use Alpha mode and Alpha cutoff to use the alpha channel of the Texture for transparency.
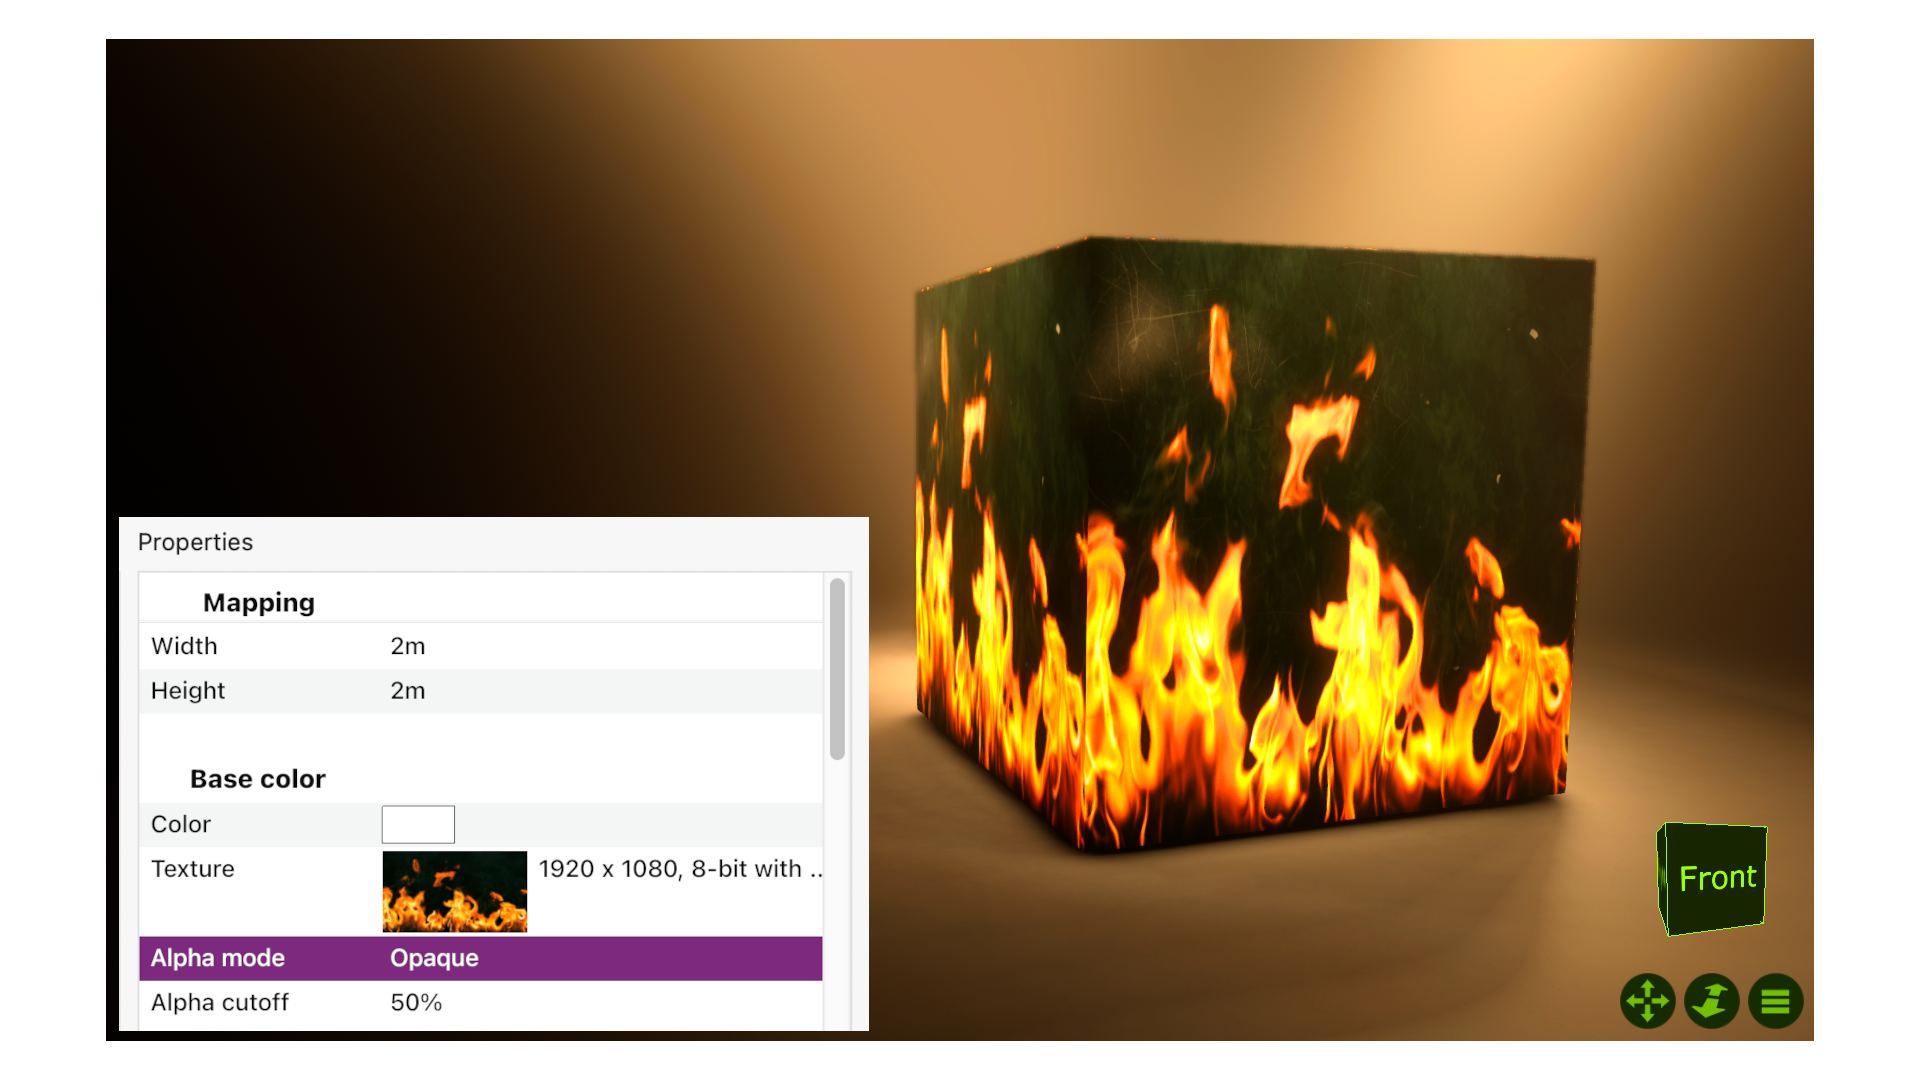
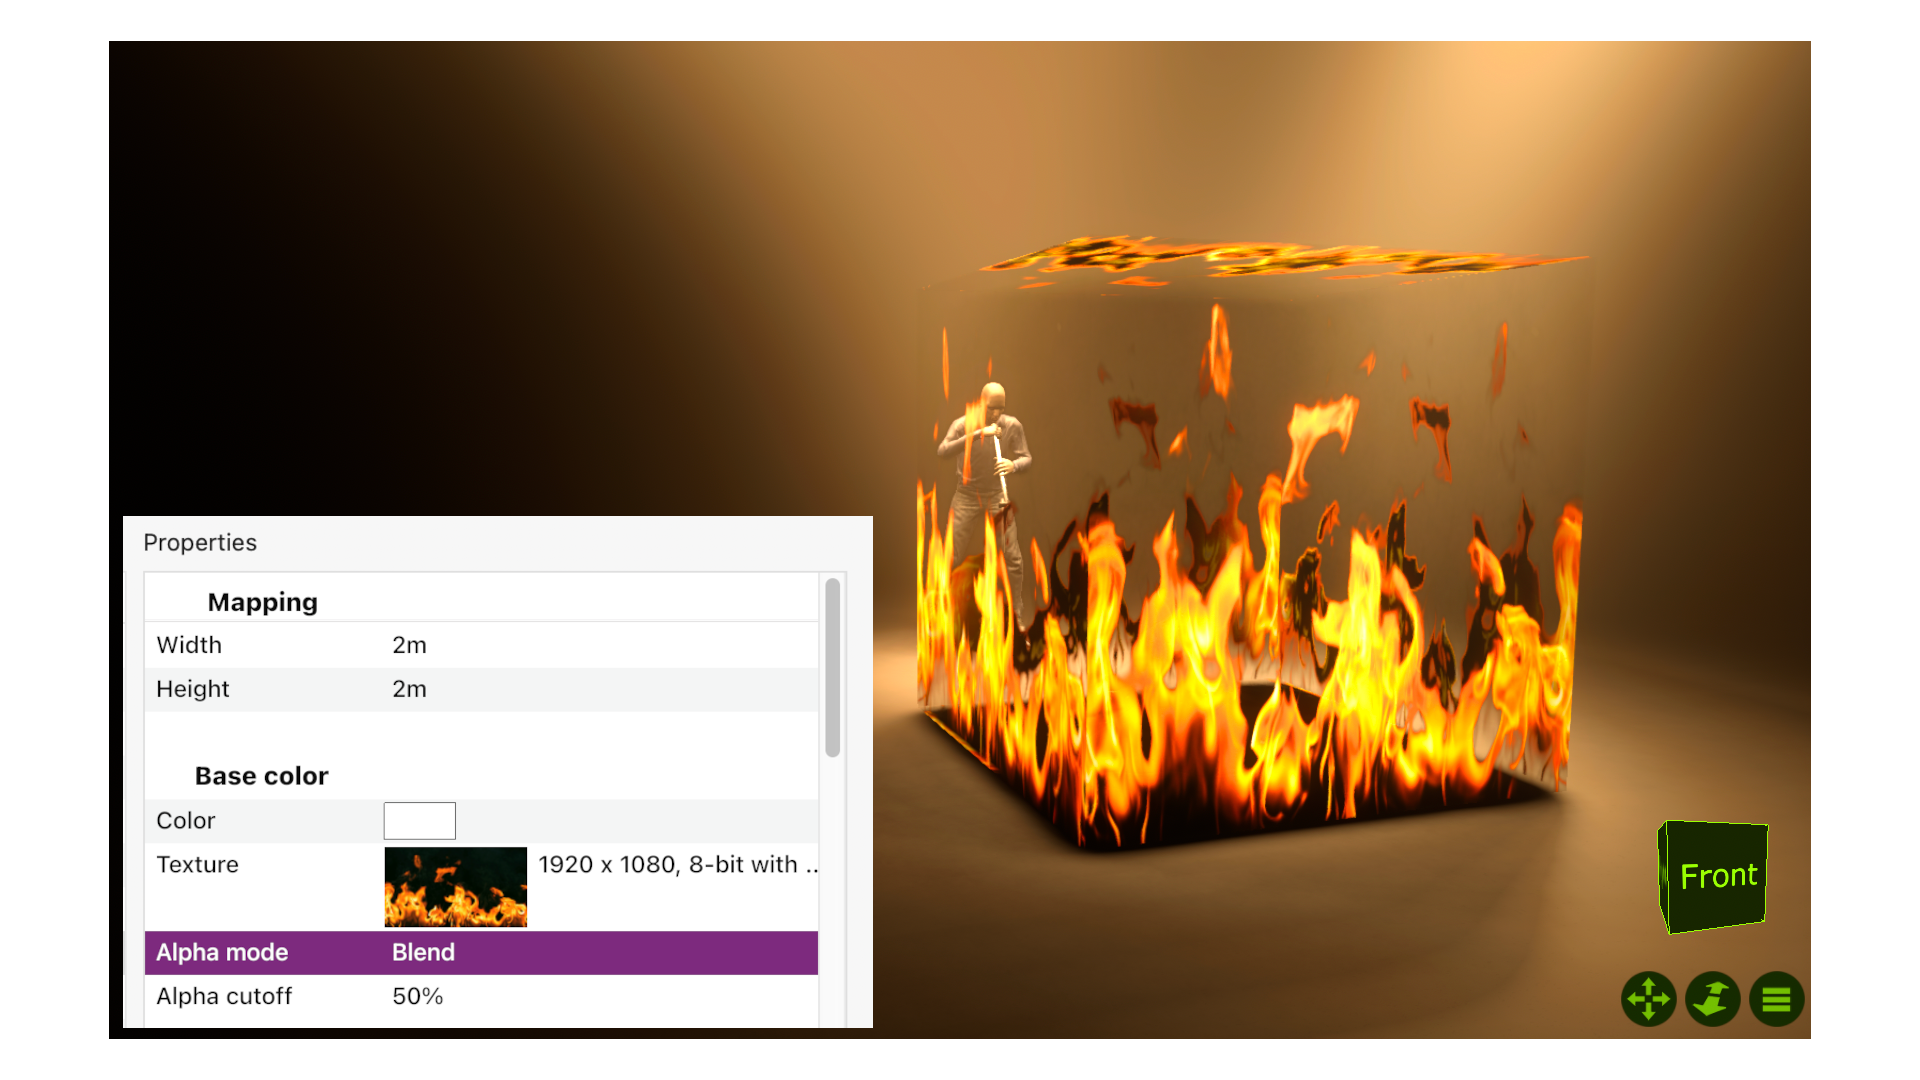
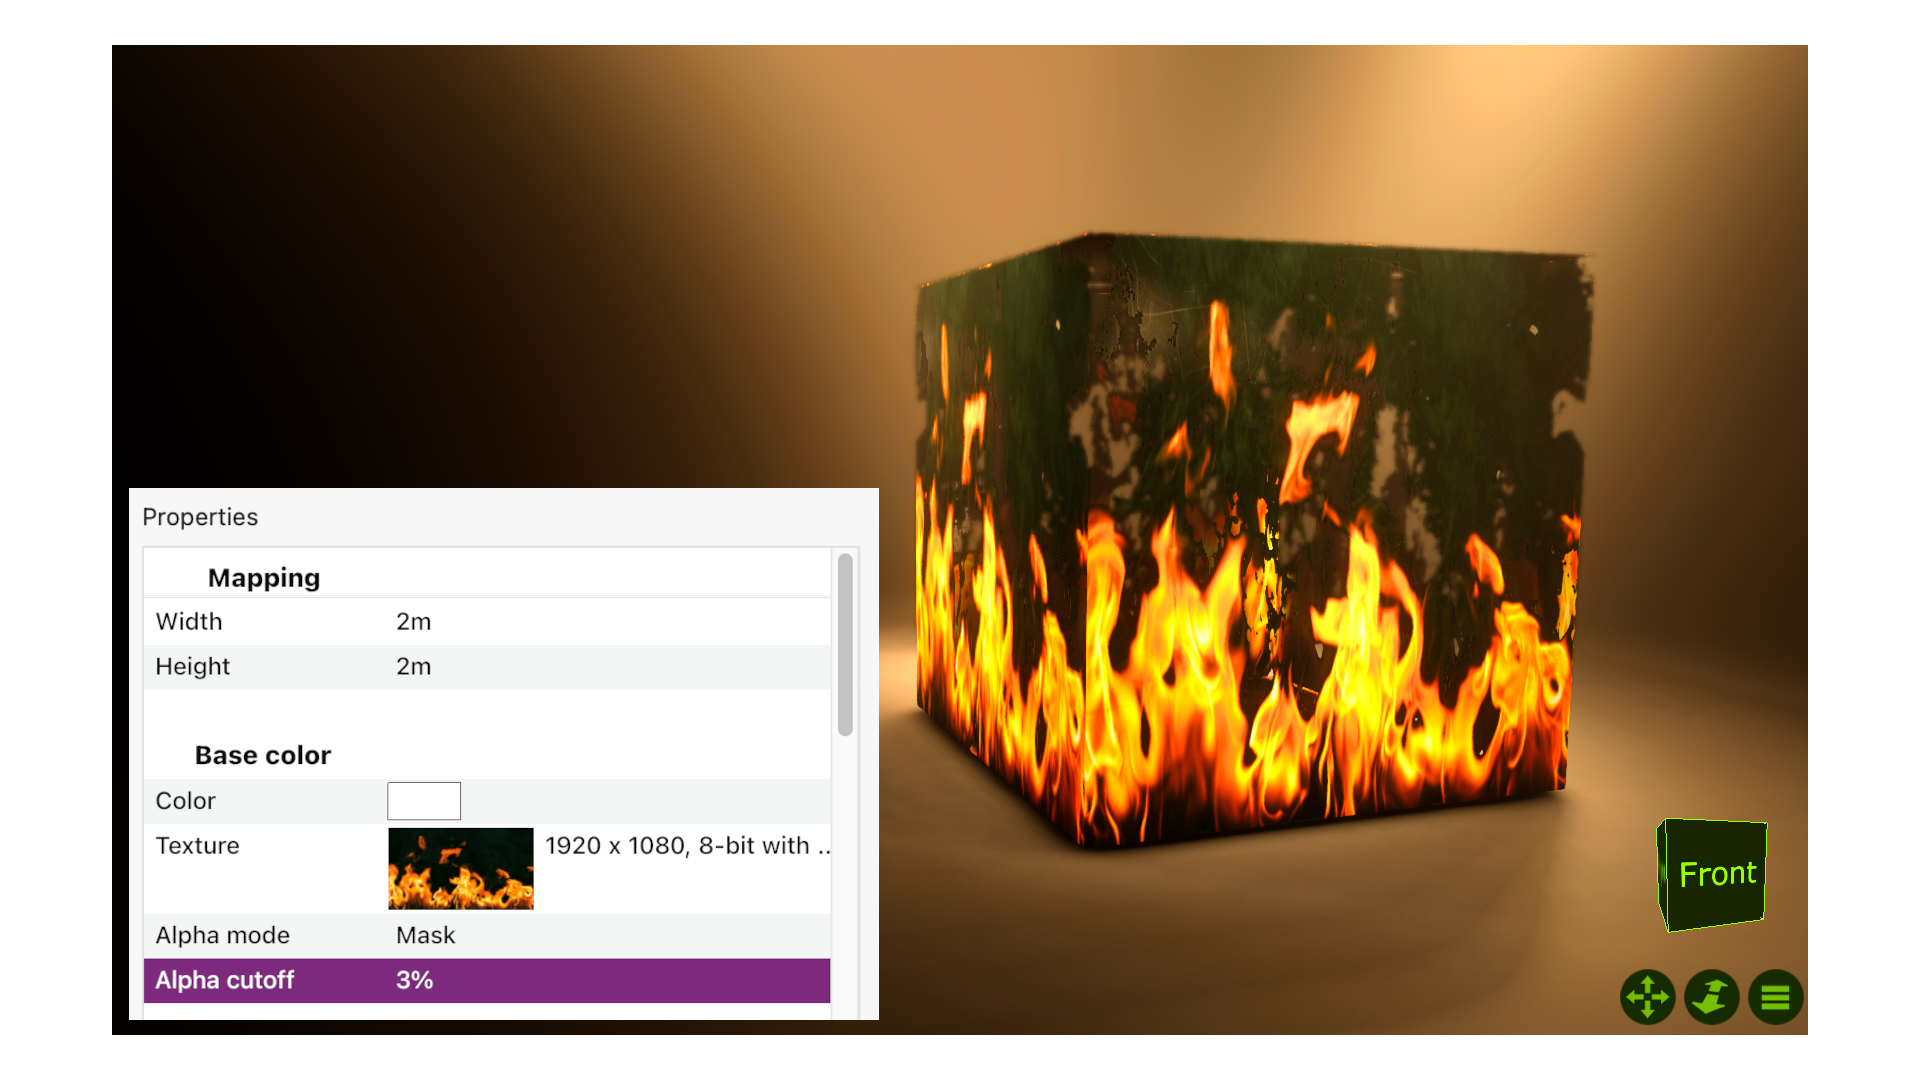
If the base colour’s Texture has an alpha channel, you can control the behaviour of the material’s transparency through the Alpha mode property and the Alpha cutoff percentage.
Opaque will disable the transparency of the alpha channel.
Blend will enable the transparency of the alpha channel. Alpha cutoff does not apply to this mode.
Mask will enable the transparency in relation to the Alpha cutoff percentage.
12.9.1.3 Surface
The Metallic property allows you to mimic metallic looking finishes. This should normally only be set to either 0% or 100%. If a Metallic texture is applied, the Metallic property scales it and should then normally be set to 100%.
The Roughness property defines how rough or smooth a surface is on a microscopic level. A material such as concrete would have a much higher roughness value than for instance varnished wood. If a Roughness texture is applied, the Roughness property scales it and should then normally be set to 100%.
12.9.1.4 Geometry
A Normal texture can be used to create the effect of unevenness. Its effect can be scaled using the Normal scale property.
In the event that the coordinate system of the Normal texture does not match Capture’s, use the Normal Y flip property to flip the Y coordinate.
Use an Occlusion texture to control the impact of ambient and fill lighting. You can scale the effect of the texture using the Occlusion strength property.
12.9.1.5 Luminance
The Luminance property allows you to create materials that simulate light emitting surfaces, such as backlit panels.
The Texture, Texture generator and Texture media choices are mutually exclusive.
Any Texture is combined with the Color.
12.9.1.6 Fluorescence
A material’s Fluorescence level affects its ability to convert the wavelengths of the light that it reflects. This is what allows a fluorescent green surface to be lit with blue light and still appear green.
The Texture property allows you to control fluorescence through masking. When in use, the Fluorescence property scales it, so is then normally set to 100%.
12.9.1.7 Transparency
Transparency allows you to set transparency for an object so to act like glass or gauze. Backprojection allows you to see light projected on the back of a surface, but not actually see anything else behind that surface.
These properties work together with the Tint which determines whether items behind the object assume the colour of the object itself, as is the case with glass but not gauze. Finally Frost allows you to to give transparent objects a frosted effect.
12.9.1.8 Face
Capture materials are normally Doublesided so that surfaces are visible from both sides. Turning it off allows you to cull (hide) the backfacing side of surfaces.
You can force the camera facing side of a surface to always act as the front side using the Forwardise property. This makes both sides of a normal mapped surface to look identical.
12.9.2 Importing PBR Texture Sets
The following standard texture suffixes are supported:
| Suffix | Texture | Channels |
|---|---|---|
| _color, _base_color, _basecolor, _albedo | Base color | RGBA |
| _metalroughness, _metallicroughness, _roughnessmetallic | Metallic and Roughness | BG |
| _metalness, _metallic | Metallic | (any) |
| _roughness | Roughness | (any) |
| _normal | Normal | RGB |
| _ao, _ambient_occlusion, _ambient, _ambientocclusion, _occlusion | Ambient Occlusion | (any) |
12.9.3 Texture Generators
Texture generators are a kind of crossover between media servers and static image textures. Texture generators produce an image that is controlled by DMX which can be used for a number of different effects such as dimming luminous objects, simulating RGB LED tapes or star cloths.
Texture generators support a number of DMX modes. In Dimmer mode each cell is coloured from black to white, based on a single DMX value. In the other RGB modes each cell’s colour is controlled by three to five DMX channels.
12.9.3.1 Matrix
A matrix image with columns and rows where each cell is individually controllable. The total number of cells is determined by the number of rows and cells used.
12.9.3.2 Star cloth
A piece of cloth with randomly placed LEDs.
The maximum size is 6m by 6m. It is recommended, but not necessary, that the size of the material is set to the same size.
The LED diameter is specified in mm and can range from 3mm to 10mm. Up to 400 LEDs can be used. The LEDs can be divided into up to 8 individually controllable cells.
If larger pieces of star cloth are required, create a texture generator that represents a portion of the full cloth. Ie. a 7m by 5m star cloth could be achieved using a 3,5m by 2,5m texture generator representing a quarter of the full cloth.
12.10 Gobos
Custom gobos can be added by clicking the Add button. Once you have given the gobo a name you can choose an image for it. Use a square image, up to 256 by 256 pixels in size.
Finally drag and drop the gobo onto any fixture with a gobo slot to add it to the fixture. If you have selected multiple fixtures when doing this, the gobo will be added to all of them.
12.11 Frame Lists
In case you need to create a custom colour wheel or scroller, you can do so by adding the fixture in question into your project and edit the colour wheel.
Once selected, go tho the Library tab → Selected items category → Lighting Fixture properties and double click on any colour of the colour wheel.
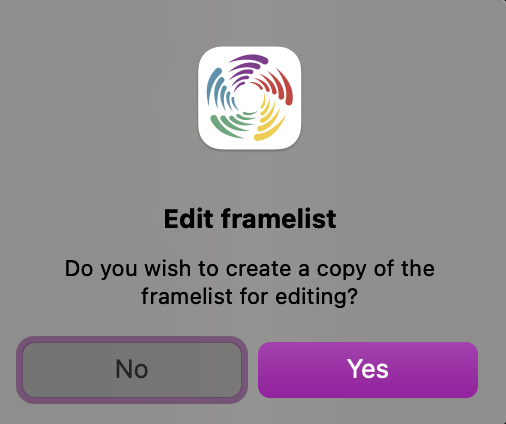
Click YES on the window prompting you to edit.
You can now go the to the Library tab → Filters category find the correct filter and drag and drop it into the corresponding slot. You can also Empty, Add or Delete the frame by right-clicking on it. Close the Framelist window when you are done.
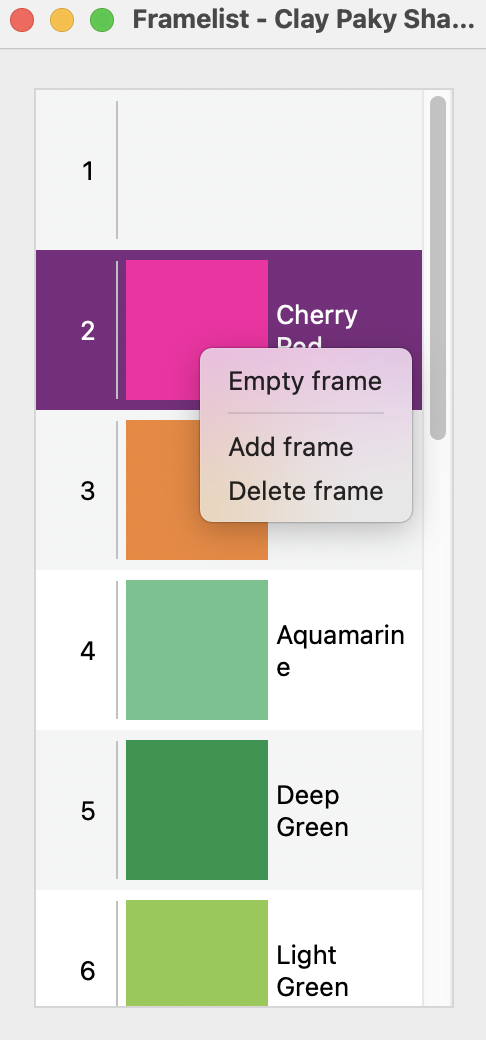
Now the edited colour wheel lives in the Frame lists category of the Library tab and you can drag and drop it to any other fixtures of the same type. Once created, you can edit the frame list from here.
12.12 Symbols
Custom symbols can be imported by clicking the Add button. SVG files with shapes (vector-based content) can be imported - bitmap elements and text is not included. Symbols can be dragged and dropped both onto fixtures to replace their plot symbol but also straight into a design view to insert them as they are.
Use the Scale property to adjust the size of the symbol in the event the SVG was not drawn to scale.
Imported symbols are automatically centered. The Vertical offset property allows for an offset to fixtures that have an asymmetrical displacement.
The Aperture width property refers to the width of the front of the fixture and dictates the size of external accessories such as barn doors and top hats.
12.13 Reports
Use the Add button to add new reports. A selection of report templates are available.
The Delete button deletes any selected reports and the Duplicate command can be used to duplicate a single report.
When a report is selected, a preview can be seen on the right hand side. To edit a report or access other functions such as exporting and printing, use the Edit button which opens the Report Editor.
12.14 Plot Styles
There are times where written information on plots is too small to read or too big to fit. You can change that by creating a Plot style and apply it to your views and to your plots.
Go to the Library tab → Plot styles category and press the Add button to create a new one. Drag and drop it to one of the views or right click on the name of the plot style to apply it to all views or to duplicate it.
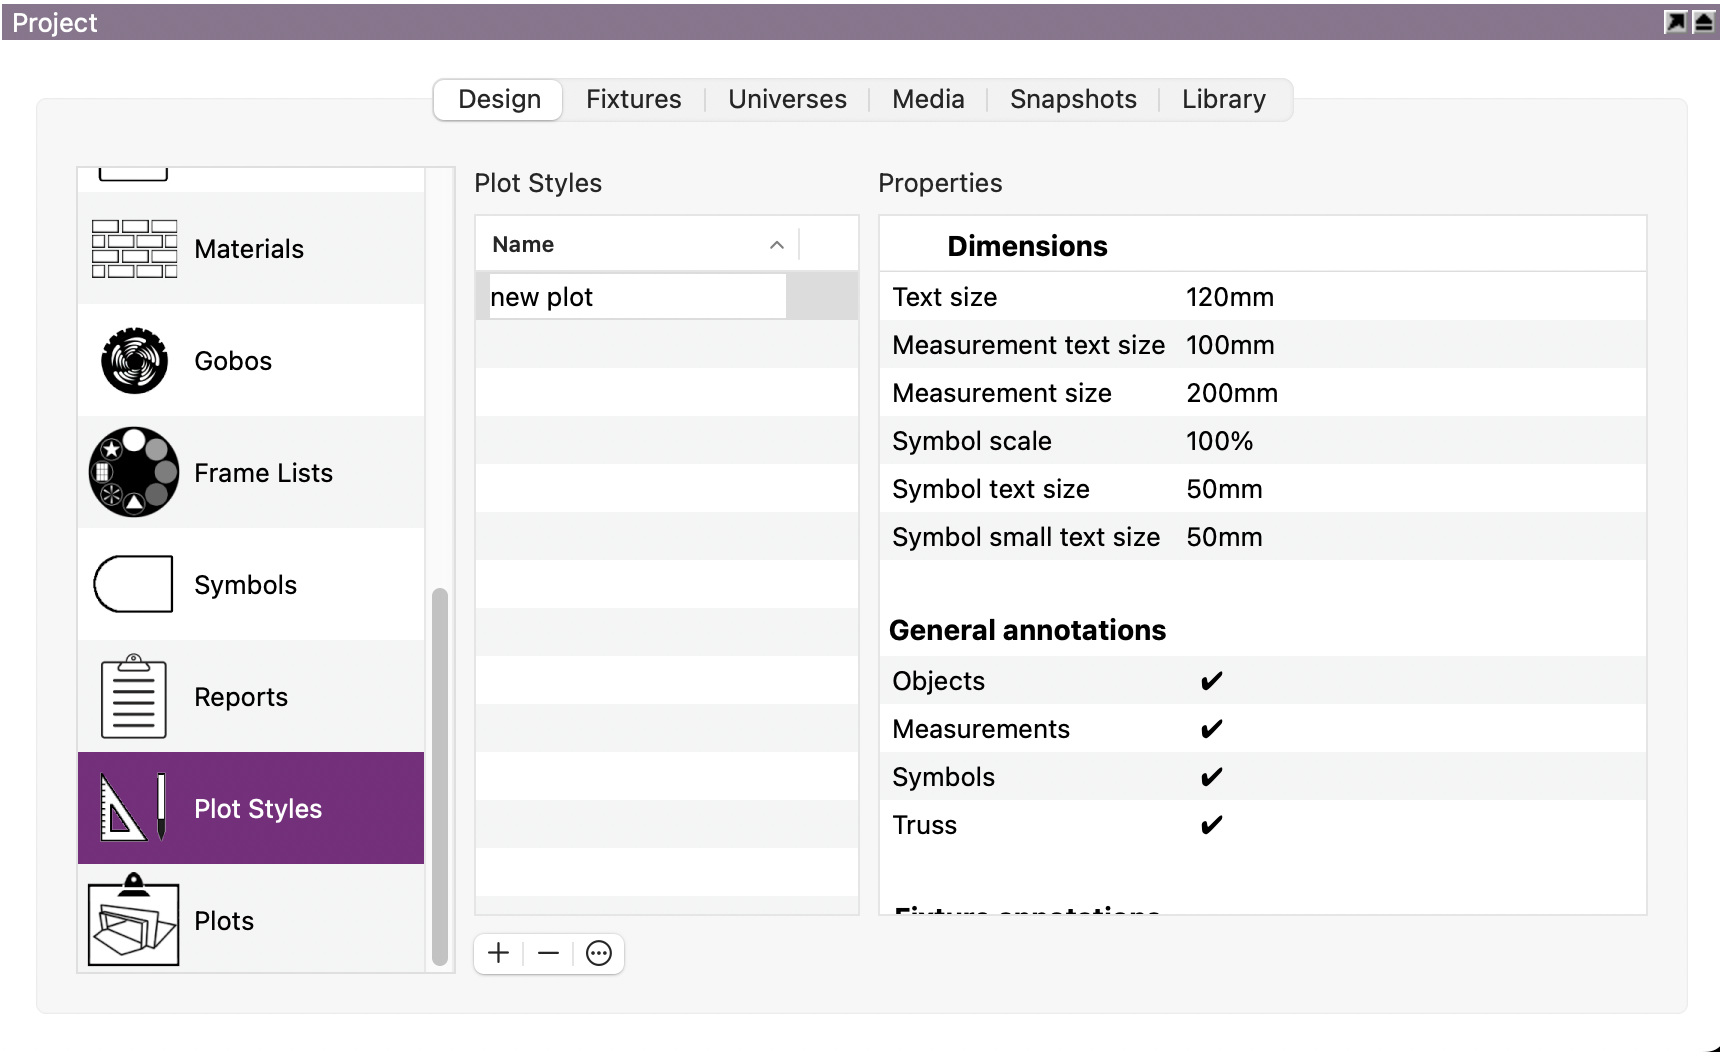
Text size affects the size of channel, patch, unit, colour and focus information.
Measurement text size affects the size of the measurement whereas Measurement size changes the size of the markings.
You can also change the size of the symbols by adjusting the Scale.
Symbol small text size affects information like wattage and optics.
Under General annotations and Fixture annotations you can choose what information to show or hide on your plot.
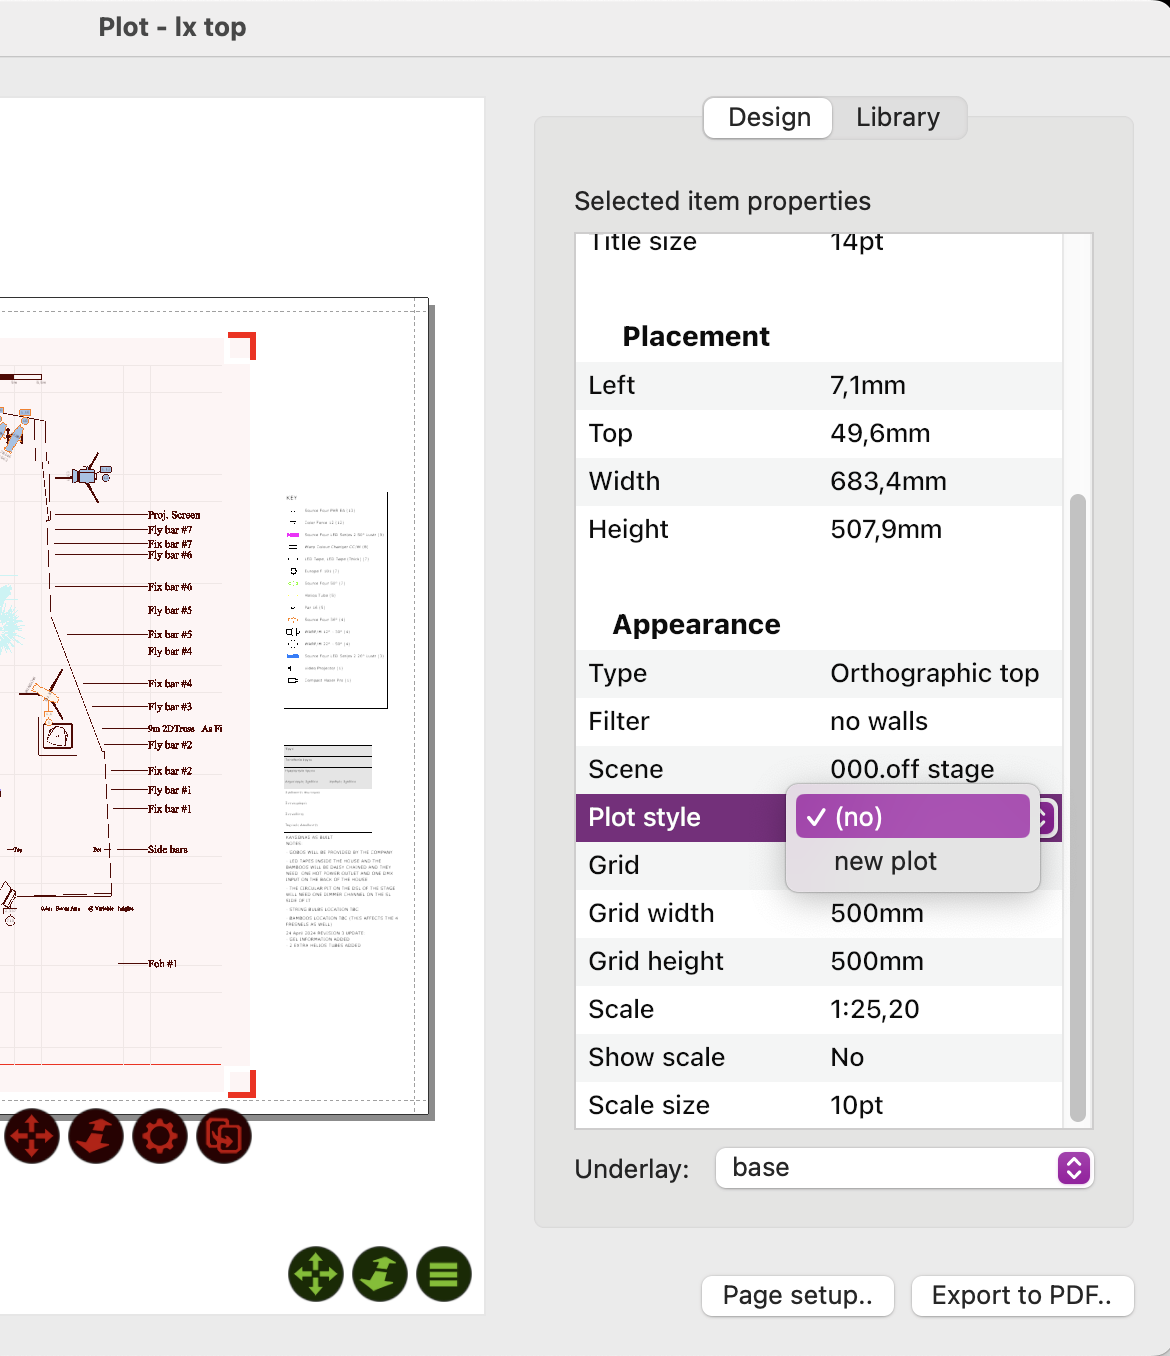
In order to apply the created plot style to one of your plots you need to edit the plot and choose the style under Design tab → Appearance section → Plot style property
12.15 Plots
Use the Add button to add a new plot.
The Delete button deletes any selected plots and the Duplicate command can be used to duplicate a single plot.
When a plot is selected, a preview can be seen on the right hand side. To edit a plot, use the Edit button which opens the Plot editor.